Showing posts with label Guides. Show all posts

Tuesday, 21 January 2014

Spider’s Silk Farming Guide

Spider's SilkUpdated: 21st January 2014. 
So you want to find the best places to farm spider's silk in the world of warcraft do you. Well I have have been busy finding the best locations and spiders to farm said such resources. Including accurate videos and stats.


Farming Spider's Silk Guides for Mists of Pandaria


Farming Spider's Silk in: Darkshire Duskwood

My first port of call was Duskwood located in Darkshire. There are three types of low level spiders in this area all of which drop "Spiders Silk" I have put together several videos for each type of spider.
These spiders include:
  • Venom Web Spider
  • Black Widow Hatchling
  • Black Widow
I am currently re-working the content on this page so that it has the most useful and relevant information for you. Drop rates will be available shortly


Above: Farming Spider's Silk - Black Widow Hatchling - Darkshire Duskwood


Above: Farming Spiders Silk - Venom Web Spider - Darkshire Duskwood


Above: Farming Spider Silk - Black Widow - Darkshire Duskwood


Darkshire Spider Silk Locations

Above: Map location of spiders in Duskwood Darkshire

Farming Spider's Silk in: Thelgen Rock - Wetlands

My second area is the Wetlands, specifically Thelgen Rock. Here you will find three types of spider, the Cave Stalker and the Leech Stalker. In addition there is a rare that hides inside the cave near the pool of water at the end. There are two major spiders here, and one rare all of which will drop spider's silk. The best practice is to clear the outside of the cave first, then the inside top and bottom. On the way back more cave stalkers will spawn so you can collect more spider's silk as you leave, and once outside the Leech Stalkers should have re-spawned so you can loot them too.

These spiders include:
  • Cave Stalker
  • Leech Stalker
  • Leech Widow (Rare)

Above: Farming Spider's Silk in the Wetlands - Thelgen Rock


I am currently re-working the content on this page so that it has the most useful and relevant information for you. Drop rates will be available shortly

Please note that this page is currently being updated, more content will be available shortly including other areas, and drop rates. If you have at all found this useful be sure to subscribe to my YouTube Channel and follow SimplyWarcraft!


Sunday, 8 July 2012

Farming: Gooey Spider Leg


The best place I have found to farm Gooey Spider Leg is Thelgen Rock located in the Wetlands. Please view stats on the drop rate for Gooey Spider Legs from each of the Wetlands Spiders below

The best place to farm “Gooey Spider Leg” is in fact located at “Thelgen Rock” in the “Wetlands”. Benefits of farming “Gooey Spider Legs” in this area is a fast spawn rate of spiders and there are two different types of spider (three including a rare inside the cave itself). From personal experience the "Cave Stalkers" found inside the cave, and the "Leech Stalkers" found outside the cave both have the same drop rate for Gooey Spider Leg.

Wetland Spider Location


Leech StalkerCave Stalker

Leech Stalker Gooey spider leg Drops (found outside the cave):

  • 7 x Successful Gooey Spider Leg loots
  • 13 x Unsuccessful 
  • Total Kills: 20
  • (Drop Rate of gooey spider leg from Leech Stalker: 35%)

Cave Stalker Gooey spider leg drops (found inside the cave):

  • 7 x Successful Gooey Spider Leg Loots
  • 13 x Unsuccessful
  • Total Kills: 20 (Drop rate: 35%)

I know that there are a lot of people and sites out there with a variance in opinion on the best spiders to kill to farm Gooey Spider leg, this guide was accurate as of my own personal findings while playing the game on the 8th July 2012.

If you have found this post useful or have any further questions please feel free to comment below and I will update the page with the information that you require. 


Thursday, 5 July 2012

Farming Arctic Fur

Right I'm going to get right to the point, you want Arctic Fur right?


You have two ways of obtaining it.
  1. Farm it from Northrend Beasts
  2. Buy it from the Auction house

Obtaining Arctic Fur if you are NOT a professional skinner.

If you are not a Skinner then you will have to purchase Arctic Fur from the Auction house, usually they sell (on my server) for upwards of 50 Gold a piece, they are very rare 1% drops hence their high value in the auction house.

Obtaining Arctic Fur if you ARE a professional skinner.

If you are a Skinner then you need to have at least 375 Skinning Skill before attempting to skin the beasts that carry this valuable and rare loot. 

From experience the best place to farm Arctic Fur is in the Borean Tundra, Northrend.
  1. If you travel to "Amber Ledge" there is a load of Wooly Rhino in the area. 
  2. Farm enough Wooly Rhino and you will start finding the rare blue item known as "Arctic Fur".

What beasts drop Arctic Fur?

I have personally had Arctic Fur drop from the following Northrend beasts
  • Wooly Rhino (Borean Tundra near Amber Ledge)
  • Wooly Rhino Bull (Borean Tundra near Amber Ledge)
  • Wooly Rhino Calf (Borean Tundra near Amber Ledge)
  • Tundra Mammoth (Borean Tundra)
  • Tundra Mammoth Calf (Borean Tundra)
  • Tundra Mammoth Bull (Borean Tundra)
  • Lunchbox (Borean Tundra near Amber Ledge)
  • Dreadsaber (Sholazar Basin)
  • Longneck Grazer (Sholazar Basin)
I hope that this quick and straight to the point guide has helped you, if you have any questions regarding Arctic Fur and how it can be obtained please feel free to comment below.

Thursday, 14 June 2012

How to restore a recently destroyed, sold or disenchanted item

Right you are here because you have either sold, destroyed or disenchanted an item recently or you just want to find out how you can restore an item back to your account for future reference. This is a quick guide that I have put together to assist you further on this quest of item restoration using the new Battle.net "self-service" item restoration.

Right here we go...

Guide to restoring lost items

1. Visit the following Battle.net page - - - https://eu.battle.net/support/en/restoration

2. Click on the "Begin Item Restoration" button

Caption to image above: Click the button
3. Login to your Battle.net account

4. Select the character which you lost the item on.
Caption to image above: Select your character 
If you do have restorable items you will see the following:


5. You then click on the image of the item you wish to restore it will move to the right column.

6. Click the continue button and the items are sent to your in game inbox immediately. 

7. Click the "Restore Items" button and you're done!


OR (if you don't have any restorable items)
Caption to image above: (no items restorable)


Sunday, 10 June 2012

Making Gold: Through Mining


If you are anything like me and like tedious chores which few people do and result in you with a pocket full of gold. Then you will find this page very interesting and intriguing.

I personally only do gathering professions, Mining being the main one which I enjoy the most. I enjoy it the most simply because its easy to do and the things you collect will sell for a LOT of gold per item (not per stack).

As you progress through your mining the higher the level of the items profession skill the more the gold you will find in your pocket after selling it at the Auction house.

What ores are the most profitable to farm?

The most profitable ores currently in World of Warcraft: Cataclysm are the following:

  • Elementium Ore
  • Obsidium Ore

What else can you find while mining elementium and obsidian ores?

However while mining you will also find the following elements
  • Volatile Earth
  • Volatile Water
  • Various gemstones
They can be found in the higher levels of Eastern Kingdoms, Deepholme, etc. 

How much do they sell for?

On my server the current auction house prices are:
  • Elementium Ore: 14 Gold per item
  • Obsidium Ore: 12 Gold per item
  • Elementium Bar: 32 Gold per item (2x Elementium ores make)
  • Obsidium Bar: 34 Gold per item (2x Elementium ores to make)

Where is the best place to find Elementium and Obsidium Ores?

To put it simply - Deepholme, its a miners paradise!

Is there a guide for me to quickly level up my mining?

Yes be sure to check out the following guide i wrote it for people like you!
Levels 1 - 65: http://www.simplywarcraft.com/2010/06/when-to-get-mining-training.html
Levels 66 - 125: http://www.simplywarcraft.com/2010/06/66-125-mining-skill-guide-screenshot.html
Levels 126 - 525: http://www.simplywarcraft.com/2010/06/126-175-mining-skill-guide-right-now.html

Monday, 6 February 2012

Alliance Skinning Guide 1 - 525

Today I have decided to drop Engineering for my Night Elf Hunter and peruse the skinning profession again. This is my guide to quickly improve your skinning skill using my experience.

This is a quick note list as to where to go for each skinning skill.


  1. Learn "Skinning" at your trainer
  2. Skinning 1-50 (Elwyyn Forest)
  3. :earn "Journeyman Skinner"
  4. Skinning 51 - 90 (Westfall)
  5. Skinning 91 - 110 (Loch Moden)
  6. Skinning 111 - 150 (Wetlands)
  7. Learn "Expert Skinner"
  8. Skinning 151 - 185 (Wetlands)


Step 1: Finding your Skinning Trainer and get your tools.
My main base is Stormwind one of the largest Alliance bases. The skinning trainer is located in "Old Town" district. If you already have two primary professions you will need to unlearn one of the primary professions and learn "Skinning" from the "Skinning Trainer".


Before you head out of Stormwind be sure to pick up a "Skinning Knife" from a "Trade Goods Vendor".

Step 2: Skinning 1 - 50.
The best place to start your skinning is at a small farm in Elwyyn Forest. The farm is called "Maclure Vineyards" low level boars will be there, and they spawn very quickly. Its not unusual for 6 boars to spawn one after another as you kill them so this is by far the easiest place to start levelling up your skinning.

Stay at Maclure Vineyards killing boars until you reach level 50 in skinning. Once you have reached level 50 Skinning be sure to visit the "Skinning Trainer" again to get your "Journeyman Skinner".

Step 3: Skinning 51 - 90.
Next I headed out to "Westfall" to kill "Goretusk" boars. Don't bother too much with the Coyote or Young Goretusks as they are most likely to be "green" for skinning. Just stick with the "Goretusks" as they are much higher level and skinning will be "yellow" on them.

Stay in Westfall skinning "Goretusk" until you reach Skinning 90.

Step 4: Skinning 91 - 110
From Westfall head up to "Loch Moden" and stay around the bottom and right of the lake, you will find "Loch Crocolisk" which are a "yellow".


Once the "Loch Crocolisk" turn "green" focus on the "Mudbelly Boar" and "Lakebed Snapper" turtle that are also around the area. Continue to skin the "Mudbelly Boar" and "Lakebed Snapper" until you reach skinning level 110.

Step 5: Skinning 111 - 185.
Its time to fly up to the "Wetlands" try to land at "Wheelgear's Retreat". Start skinning the "Mottled Screecher" and "Mottled Raptor" located in the area highlighted in green below.


Continue to kill the raptor's until you reach skinning 120, then move over to the east of "Greenwardens Grove" (highlighted in yellow) and peruse to kill the "Ebon Whelp" and "Ebon Slavehunter" until 150.

GO SEE YOUR SKINNING TRAINER AT 150

Continue killing "Ebon Whelp"'s in wetlands until you reach Skinning 185

Step 6: Skinning 186 - 205
The best place to move to next is the Hinterlands. It wont take long to reach skinning 205 in this area, its kind of like a quick levelling stop off before the next area. Its best to skin the "Silvermane Wolf" which are popular in this area near the alliance flightpath.

Step 7: Skinning 206 - 265
Its time to go back to Stormwind and get your "Artisan Skinning Training". 
Once you have it pop onto the boat to the other large island and head over to "Thousand Needles".


Once you have reached thousand needles you will need to skin the following beasts to gain Skinning Skills
  • "Needlespine Cobra"
  • "Needlespine Shimmerback"
  • "Scorpid Cliffcrawler"
Once you reach skinning skill 265 its time to move on to "Un'goro Crater"!

Step 8: Skinning 266 - 300
You need to head over to Un'goro crater and skin the following beasts.
They are all over the area and easy to locate so there is no need for a map.
  • Dimetradon
  • Young Dimetradon
  • Ravasaur
  • Ravasaur Runner
ONCE YOU REACH SKINNING 300 SEE YOUR SKINNING TRAINER.

Step 9: Skinning 301 - 310
You need to go through the "Dark Portal" to "Outland", when arriving in "Hellfire Peninsula" head over to the east side of "Honor Hold" and work your way down underneath "Honor hold" on foot killing the different types of "HellBoar" as you go round.

Once you reach 310 Skinning its time to move to Nagrand

Step 10: Skinning 311 - 375
Next head over to "Nagrand", this part is quite simple. If its a beast, skin it.
The best results are from first skinning the following beasts.

  • Clefthoof
  • Talbuck Stag
  • Wild Elekk
  • Clefthoof Calf
  • Injured Talbuck
Once you have 335 skinning skills you can move onto the following beasts to gain skinning skills.
  • Aged Clefthoof
  • Talbuck Thorngrazer
  • Clefthoof Bull
Step 11: Skinning 376 - 400.
Next get the boat to "Northrend" and go see your "Skinning trainer". There is one at "Valiance Keep" known as "Trapper Jack" who will give you the "Grand Master Skinning" training you need.

Head out to the Borean Tundra and farm/skin the following beasts to level up your skinning. Be sure to watch out for "Arctic Fur" that is dropped in this area as it can easily sell upwards of 80g per skin.


  • Wooly Rhino Calf
  • Wooly Rhino Matriarch
  • Wooly Rhino Bull
The wooly rhino's are mostly found around the base of "Amber Ledge" and are in ample supply.
Alternatively you can farm the following beasts
  • Infected Kodo
  • Marsh Caribou
  • Wooly Mammoth
  • Mammoth Calf
  • Tundra Wolf
  • Tundra Crawler
Step 12: Skinning 401 - 415.
Next its recommended to head over to "Stars Rest" located in "Dragonblight" to farm several beasts to increase your skinning skills. This is a short farming area.

  • Arctic Grizzly
  • Arctic Grizzly Cub
  • Arctic Ram
  • Emaciated Mammoth
  • Mammoth Calf
  • Mammoth Bull
  • Blighted Elk
  • Rabid Grizzly
  • Snowfall Elk
  • Tundra Scavenger
Step 13: Skinning 416 - 425
Next head over to "Grizzly Hills" I flew up to "Amberpine Lodge" where there are lots of beasts to skin in the nearby woods. 

Try and focus on the following beasts found on the nearby hillside.
  • Tallhorn Stag
However you can also skin the following if you so wish: 
  • Infected Grizzly Bear
  • Highland Mustang
  • Silvercoat Stag
  • Serpent Defender

Step 14: Skinning 426 - 450
Head over to "Sholazar Basin" there are lots of beasts in this area for your skinning pleasure, once you hit 445 skinning skill it will take longer to reach 450, if you want to level up your skinning quicker head over to "StormPeaks" otherwise stick with "Sholazar Basin" till you reach 450.

Step 15: Skinning 451 - 470.
Head back over to "Eastern Kingdoms" via the boat to "Stormwind" get your "Skinning training".
It may be worth adding "Stormwind" as your hearthstone as we will be coming back here shortly.
Head over to "Mount hyjal" which you can quickly access through the direct portal.

Kill the stags in this area until you reach 470 skinning.

Step 16: Skinning 471 - 485
Hearthstone back to stormwind and take the "Uldum" portal. Here you should focus on the "Crocalisks" until you hit skinning level 485.

Step 17: Skinning 486 - 525
This is the final step to maxing out your skinning skill. Hearthstone back to Stormwind and take the "Twilight Highlands" portal.
  • Tawny Owls (yes you can skin these birds)
  • Twilight Worg
  • Twilight Stag

Keep skinning till you reach the maximum skill level of 525. And you are done!
Congratulations!

If you have found this post useful or have any further questions please feel free to comment below and I will update the page with the information that you require. 


Friday, 3 February 2012

World of Warcraft Gold Making Guide 2012


Six simple tips to make gold legally on World of Warcraft

Well we all would like a little more gold when playing World of Warcraft. Whether its for crafting amazingly epic items to equip to your character or just to pay the repair bills from questing, PVP or dungeons.

I go out of my way to make gold legally on the game and here are a few tips that I have put together so you will never run out of gold on your world of warcraft characters.

Using this guide I make approximately 2000g a day.

I made the mistake of levelling up engineering and wasted most of  my gold on mats, hence the low gold value on some of the screenshots. I don't want YOU to make this MISTAKE.

Tip 1: Max your level


The only reason I say this is because its so much easier to make gold once you reach level 85 on World of Warcraft. Why? Its because once you are top level you have access to most areas of the game, and it makes it so much easier when grinding mobs or fending off vicious beasts when gathering materials to sell on.

Tip 2: Gathering professions.

From my own personal experience of playing World of Warcraft I have found that the quickest way of earning gold is in fact through the gathering professions. My reason for this is it costs you NOTHING to gather ores, skins, herbs etc... no crafting costs thus 100% profit of gold for you.


My personal choice and experience of switching between primary professions over the past 5 years I highly recommend that if you wish to make gold.

Its always best to max out your chosen gathering profession, as the higher level areas will generally allow you to collect much more valuable items, thus profit for you.

Recommended: Mining

Mining is a very time consuming profession however the rewards for selling ores, gems and volatile items such as Volatile Water, Volatile Earth etc are very rewarding due to the amount of gold that you can very quickly earn through selling these items.

Gems are commonly used by players crafting and levelling in Jewel-crafting and Engineering.
Volatile items such as Volatile Earth, Volatile Fire, Volatile Water are used in Mining, Enchanting and Engineering.

Its always recommended to smelt your collected ores into bars as generally they tend to sell for more, however always check the cost to sell ores individually before smelting just in case there is more profit in selling them as raw ores.

You should focus on "Elementium Ore', "Pyrium Ore", and other high level area ores to maximise your profits.


Recommended: Skinning


Other players who specialise in tailoring, leather working and engineering will all require leather to complete their craft, and levelling so why not take the time to max out your skinning and go out of your way to gather leather from wild beasties of Azeroth.

On my server light leather sells for over 1 gold per item, while the tougher leathers to locate such as "Arctic Fur" will regularly sell for over 80 gold for one! So skinning is a great way to earn yourself some gold.

To maximise profits try to focus on "Knolthide leather", "Light Leather", "Medium Leather", "Heavy Leather, "Rugged Leather" and the highly desireable "Arctic Fur".

Avoid: Engineering

There is no profit in Engineering as a primary profession, it only costs you gold and you earn very little from it.

I spent several months levelling my character in Engineering, I found that items created in engineering cannot be used by other players who are not engineers themselves... so basically anyone crafting items from engineering will only be able to sell to other engineering players.... who quite frankly can make the item themselves anyway... why buy it?

Tip 3: Grinding Mobs for items and money

Basically killing NPC characters such as humanoid, beast or dragonkin will give you a variety of different items, some individual items such as Spiders Silk dropped from low level spiders (SEE SPIDER SILK FARMING GUIDE) are highly valuable to tailors, leatherworkers etc for making their items. Its always good to look into the different items which players can craft and see which items are most sought after.

Even grinding MOBS in low level areas such as Westfall is most profitable, as they die from one shot kills, and often drop money and green items. Sure they may be low value but you can kill many MOBS in a short period of time and putting items for sale in the auction house will give other players the opportunity to buy them, disenchant or equip the item to their character.

Tip 4: Farming Companions

Additional to this I recommend focusing on MOBS which can drop companions too. Companions are valuable and highly desirable non-combat (currently) pets which are very collectible.

The wetlands is a easy location to grind/farm for companions

  • There is a Raptor cave where you can find a nest and collect a "Razormaw hatchling" companion which commonly sells for 150g.
  • The "Ebon Whelp", "Dragonmaw Whelpstealer" found in ample numbers do drop the "Ebon hatchling" companion.
  • The Oozes that populate several areas of the wetlands also drop "Ooze" companions so keep an eye out for them too. 

Tip 5: Auction House

Always sell any item that is used for crafting and obtained through the gathering professions at the auction house, other players NEED these items in order for them to level up and create what they WANT.


The World of Warcraft community in general is one which WANTS stuff.
So why not profit from other players but still help them out at the same time!


Tip 6: Never Destroy

Even if an item is grey "junk" never throw it out, simply sell it to a vendor, the amount of gold that you can earn from even junk items over time is immense.

If you choose to follow these simple top tips, you will never be coin shy again.

Saturday, 17 December 2011

Hunters Pet Highlight:

Unusual Hunter Pet Cat
While aimlessly wandering around the Dwarven District of Stormwind, I caught sight of a somewhat unusual hunter pet. It appears to be some kind of Technicolor cat.

Preparation – where are we going?

The owner of the pet informed me, very kindly, that it came from “Eversong Woods”, now I want to see if I can find this interesting looking feline, and tame it to call my own.
Eversong Woods is the north-most point of the main land of Eastern Kingdoms, located north of Ghostlands. (Please note I am not using any guides to locating this pet).

Finding a way to Eversong Woods.

If you don't have the flight path to Ghostlands then the best way I found to reach “Eversong Woods” is by flying up to Eastern Plaguelands, then going through the portal at the most north point of Eastern Plaguelands through to the Ghostlands.

If you do have the flight path to Ghostlands then fly there from your nearest flight master.
One you are in Ghostlands continue north, you need to run straight through Ghostlands (you cannot fly) then running through to the next zone to the north –“Eversong Woods”.
Springpaw Stalker

Where to find this beast?

After 30 minutes or so of looking for a animal that I didn't even know the name of I came across an area with the kitty which I was looking for. They are known as the “Springpaw Stalker”.
Below is a map which I have taken from my screenshots showing the location clearly of where I found the “Springpaw Stalker”.
Springpaw Stalker Location Map

The beast has been tamed

I selected a “Springpaw Stalker” to tame, they are only level 6-7 and so are very easy to trap and tame, therefore call your very own.
Springpaw Stalker Hunter Pet
I hope that you have enjoyed this guide to finding this unusual pet. I believe that it is unusual for any Alliance Hunter to own this pet as it is only obtainable in a dense Hoard area, and cannot be found in any alliance areas of the game.

Tuesday, 19 July 2011

Alliance: Herbalism Guide – Complete herbalism in 2 days!

If you choose to follow this guide I can assure you that if you are level 85 it will only take you 2 days to level up your herbalism to 525 if you are willing to put the time and effort into it!
I have recently switched primary professions from Skinning to Herbalism. This is simply because there is more gold in it than skinning.
As I am starting herbalism from scratch I have decided to write this guide to help future herbalists on World of Warcraft.
I have split this up into two sections:
1. Alliance herbalism guide
2. When to meet your trainer

Step 1: Get herbalism profession

If you have not already got herbalism as a profession you need to start it. If you already have two professions you will have to unlearn one of them to start herbalism. You can do this by going to your “Spellbook and Abilities” then click on “Professions” Click on the red circle with a line through it to unlearn a profession.
Once you have less than two primary professions you can then visit a “Herbalism Trainer” to start learning herbalism.
Unlearn Profession

Step 2: Start Gathering | 1 - 70

The best place to start I have personally found for herbalism for the Alliance is by gathering Peacebloom and Silverleaf in Elwynn forest just outside of Stormwind.
Continue to gather Peacebloom and Silverleaf until you reach 50 herbalism points which is when you should go back to your Herbalism Trainer to learn Journeyman Herbalism.
Once you have seen the Herbalism Trainer go back to Elwynn forest and continue gathering herbs until you reach 70 herbalism points.

Note: At 15 herbalism skills you can then gather “Earthroot” which is found on hills in Elwynn Forest.

Step 3: Herbalism | 71 – 125

Once you have reached the skill of 70 in herbalism it is strongly recommended to go and visit “Hillsbrad Foothills” where you can progress your herbalism where you will find a lot of Mageroyal and Briathorn to increase your herbalism skills.


Step 4: Herbalism | 126 – 150

Once you have 125 herbalism skill points its time to move to “Stonetalon Mountains” where you can find Bruiseweed, Wild Steelbloom and Briarthorn to increase your skills, try to focus on Bruiseweed and Wild Steelbloom as its they best of the three herbs in the area.


Step 5: Herbalism | 150 - 160

At 150 herbalism points you will need to go see your herbalism trainer to progress any further. Once you have had the training its time to visit the “Southern Barrens
You can collect Kingsblood and Liferoot in the northern part of Southern Barrens.

Step 6: Herbalism | 160 – 200

Once you reach 160 herbalism skill points its time to move to Western Plaguelands where you can find Liferoot and Fadeleaf. Once you reach 165 herbalism points you can then gather everything in the Western Plaguelands area as Khadgar’s whisker will become available and as there are a lot of it in this area you will quickly reach 225 herbalism skills.

Step 7: Herbalism | 200 - 225

The first step is to visit your herbalism trainer to get “Artisan Training” if you have at least 200 herbalism skill points. Once you have Artisan herbalism training travel back to Western Plaguelands and continue to gather herbs until 225.

Step 8: Herbalism | 225 – 275

Travel to Eastern Plaguelands. Collect the herbs in the area until you are at least 275 in herbalism skills. You can collect Khadgar's Whisker until you are able to collect Sungrass in this area at 230.

Step 9: Herbalism 275 – 300

Once you have 275 herbalism skills you must visit your herbalism trainer again for “Master Herbalist” training. It is then advised to travel to the Blasted Lands to continue your herb gathering where you will be able to find Dreamfoil, Gromsblood and Mountain Silversage. You can also find Golden Sandsam at the beach in Blasted lands near Rockpool Village.

Step 10: Herbalism 300 – 350

Hellfire Peninsula

This part is simple, travel to Hellfire Peninsula in Outland and start gathering herbs!
You should be collecting Felweed, Dreaming Glory. Golden Sandsam and Dreamfoil in this area. However if you do get bored of such a long amount of time in Hellfire Peninsula, move on to Zangarmarsh when you reach herbalism skill 325.

Optional: Move to Zangarmarsh at 325

I personally moved to Zangarmarsh when my herbalism reached 325 due to boredom. However I strongly believe that Hellfire Peninsula is more than capable of getting any player in herbalism to 360. The choice is yours.

Dreamfoil, Ragveil, Felweed, Blindweed, Golden Sandsam. Flame Cap and Dreaming Glory can be found in Zangarmarsh
Additional Tip: Bog lords in Zangarmarsh can be gathered for herbalism to collect Zangar Caps.

Step 11: Herbalism 350 – 360

Once you reach 350 in herbalism be sure to go to shattrath city to get your herbalism training. The reason why I say this is because Terokkar Forest is a good place to gather herbs up-to 360. You will find many types of herbs including, Terocone, Felweed etc.
Basically its easier and quicker for you to find a flight path to the next area if you choose to visit Terokkar Forest up-to 360

Step 12: Herbalism 360 – 375

Now you need to travel to Northrend to the Borean Tundra. You should go round this area gathering the following herbs. Goldclover, Fireleaf and Frost Lotus and Tigerlilly. You will also find Deadnettle in the GoldClover herbs.

Step 13: Herbalism 375 – 450

Head to Sholazar Basin in Northrend and continue collecting Goldclover, Tigerlilly. Once you reach 400 you will also be able to collect the Adder’s Tongue that is in the area.

Step 14: Herbalism 450 – 500

Next visit your herbalism trainer to get Illustrious training. From here you need to visit Deepholm where you can gather Cinderbloom.
Once you reach 475 you can then gather Heartblossom. Both Cinderbloom and Heartblossom are found throughout Deepholm and they can bring a tasty profit in the auction house!

Final Step – 15: Herbalism 500 – 525

This step is relatively easy simply flap on over to Uldum where you can then progress your training further by gathering Whiptail which are found around the river banks. These sell very well in the auction house and can often drop Volatile Life which sell easily in the auction house for 20g. But prices will range depending on what server you are on. Whiptail will also occasionally drop Lifegiving seed which can be useful.

Well there you go, this is how I progressed through the herbalism training and best of all it only took me 2 days!

When to meet your herbalism trainer

1. 0 herbalism skill points - When you first start herbalism
2. 50 herbalism skill points – Journeyman herbalist training
3. 150 herbalism skill points – Expert herbalist training
4. 200 herbalism skill points – Artisan herbalist training
5. 275 herbalism skill points – Master herbalist training
6. 350 herbalism skill points – Grand Master Herbalist training

Sunday, 29 August 2010

Un'Goro Crater Pylons
This is a quick guide for anyone wishing to use the Un'Goro Crater crystal pylons and information on how to make each of the crystals and what pylon and crystals to use.

Western Crystal Pylon

> Crystal Ward
    Strengthen the protection you have against physical damage
    10 Red power crystal
    10 Green power crystal

> Crystal Yield
    Weaken an enemy's defenses
    10 Red power crystals
    10 Blue power crystals

Northern Crystal Pylon

> Crystal Restore
    Used to heal yourself or your allies
    10 Yellow power crystal
    10 Green power crystal

> Crystal Charge
    Used to create a large explosion that can inflict damage on your enemies
    10 Red power crystal
    10 Yellow power crystal

Eastern Crystal Pylon

> Crystal Force
    Used to increase your spirit
    10 Green Power Crystal
    10 Blue Power Crystal

> Crystal Spire
    Used to create a shield that does damage to enemies
    10 Blue power crystals
    10 Yellow power crystals

Sunday, 15 August 2010

Blizzard Addon Tutorials: Hello World & Show Me The Money


I have gone ahead and re-activated my World of Warcraft account after having some time away from the game. I am very interesting in building a website with details on items of the game and so I will be creating an addon for the game which collects the information needed to expand on the topic. I have contacted Blizzard about this and they dont have a problem with me doing this in fact they have given me further inspiration to go ahead and expand on it.


I have currently been through Blizzards tutorial "Hello World" and the language used is a form of Javascript so far with an xml feed. I am familiar with the basics of javascript due to being in the website design and coding business myself. Its very simple so-far.


Error with Show Me The Money Advanced Addon Tutorial & How To fix it

If you have like me been doing Blizzards own addon tutorial known as Show Me The Money, you will experience the

"Error Money Type Not Set"


This is because Blizzard have updated their variables in the game but not updated their tutorials.
To resolve this issue simple replace the line:  


MoneyFrame_SetType("STATIC");  


With 


MoneyFrame_SetType(self, "STATIC");
 

found in the ShowMeTheMoney.xml, remember to reload it after making the change by using /script ReloadUI(); in game.

Monday, 21 June 2010

Mining: What you need to know in plain English


Mining Basics: What you need

The basics of mining are simple, to start mining you need the following:


1. At least one of your main professions as Miner, this can be added to your character by visiting any Mining trainer. 
If you already have two primary professions - none of which are mining then you need to unlearn one which you can do from your "Character" profile under "Skills". 
2. Mining Pick: this is used to dig up ores for Mining. 
3. Smelting: This is a skill known by all Miners and will increase your mining skill. Simply visit a forge and "Smelt" your heart away making your raw ores into bars of metal!


Mining Training: When to get mining training

Its always a good thing to know when to go to your Mining trainer to pick up some additional skills, so here are the key skill points of Mining in plain English.
  • Apprentice Miner (No requirements)
  • Journeyman Miner (Mining 50)
  • Expert Miner (Mining 125 - Level 10)
  • Artisan Miner (Mining 200 - Level 25)
  • Master Miner (Mining 275 - Level 40)
  • Grand Master Miner (Mining 350 - Level 55)
  • Smelt Bronze (Mining 65)
  • Smelt Tin (Mining 65)
  • Smelt Silver
  •  (Mining 75)
  • Smelt Iron 
  •  (Mining 125)
  • Smelt Gold
  •  (Mining 155)
  • Smelt Steel 
  •  (Mining 165)
  • Smelt Mithril 
  •  (Mining 175)
  • Smelt Thorium 
  •  (Mining 230)
  • Smelt TrueSilver 
  •  (Mining 230)
  • Enchanted Thorium (Mining 250)
  • Smelt Fel Iron 
  •  (Mining 275)
  • Earth Shatter 
  •  (Mining 300)
  • Fire Sunder 
  •  (Mining 300)
  • Smelt Adamantite 
  •  (Mining 325)
  • Smelt Cobalt 
  •  (Mining 350)
  • Smelt Eternium 
  •  (Mining 350)
  • Smelt FelSteel 
  •  (Mining 350)
  • Smelt Hardened Adamantite 
  •  (Mining 375
  • Smelt Khorium 
  •  (Mining 375)
  • Smelt Saronite 
  •  (Mining 400)
  • Smelt Titanium 
  •  (Mining 450)
  • Smelt Titansteel 
  •  (Mining 450)
  • 1 - Copper
  • 65 - Tin
  • 65 - Incendicite
  • 75 - Silver
  • 75 - Bronze
  • 125 - Iron
  • 150 - Indurium
  • 155 - Gold
  • 155 - Lesser Bloodstone
  • 165 - Steel
  • 175 - Mithril
  • 230 - Truesilver
  • 230 - Dark Iron
  • 245 - Small Thorium (could be lower)
  • 255 - Rich Thorium
  • 275 - Hakkari Thorium Vein
  • 300 - Fel Iron
  • 305 - Small Obsidian Chunk
  • 305 - Large Obsidian Chunk
  • ??? - Elementium Ore
  • 325 - Adamantite
  • 350 - Rich Adamantite
  • ??? - Eternium
  • 350 - Cobalt
  • 350 - Nethercite Deposit
  • 375 - Khorium
  • 375 - Rich Cobalt
  • 400 - Saronite
  • 425 - Rich Saronite
  • 450 - Titanium


Wednesday, 16 June 2010

Mining Guide 126 - 175

126 - 175 Mining Skill Guide


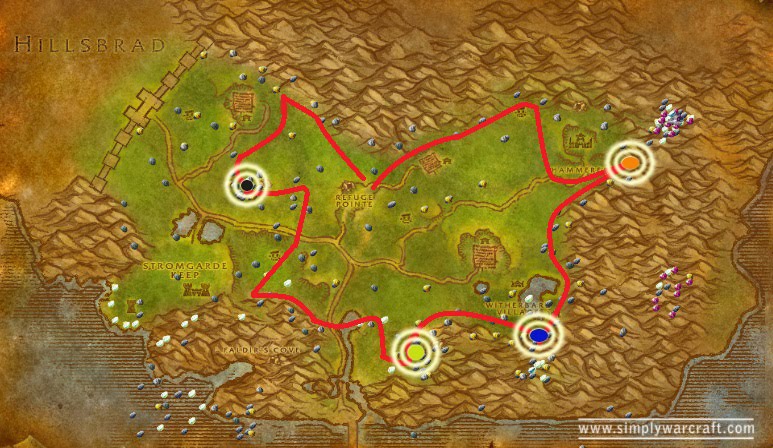
Right now assuming that you have just been to the Mining trainer and are now are an Expert miner, we now need to focus on Iron and Gold ores before we reach Artisan Mining Skill. I personally have found that the "Arathi Highlands" are the best location to find Iron ores. So what you need to do is go to "Arathi Highlands" and follow the map below to find some yummy Iron Ores. Again remember to smelt your ores so you can gain further Mining Skills.


So assuming that you are in "Refuge Pointe" which is located in "Arathi Highlands" you should see the "Forge" as shown in the image below. This is where you can smelt the ores that you find here in "Arathi Highlands". 


(this screenshot shows the forge in Refuge Pointe  - click on image to enlarge)


1. Start at Refuge Pointe and follow the guide I have given in a clockwise rotation, you will find mining veins/nodes on the hills so its best to stick to them as close as you can so that your "Find Minerals" will pick them up if there are any available.


2. When you reach hammerfall you should really go inside a mine known as "Drywhisker Gorge" there will be lots of mining nodes/veins in there so its best to check it out. (this is marked as an orange highlight on the map above)


Right the only place to Mine "Lesser Bloodstone Ore" is a hidden mine located due east of Hammerfall. I have mined in this cave many times and each time its entrance eludes me. So for your assistance I have plotted the entrance path up to this mine on the screenshot below. 

The co-ordinates of the start of the path is at (79.7, 40.0).
The mine is actually called "Drywhisker Gorge" and the cave entrance is at 82.2, 36.5. 
When you start seeing Drywhisker Mobs then you know you are near the mine.


The second screenshot below shows the entrance to the path to the mine... its behind the tree!


(this screenshot shows the location of the start of the path to the mine  - click on image to enlarge)

(this screenshot shows the entrance for the path to the mine)


This mine is the only location to mine"Lesser Bloodstone Ore" and it is only required for one quest on the game so its worth mining to sell in the Auction house as its difficult for lower level alliance players to get.


(This screenshot shows "Lesser Bloodstone Vein"  - click on image to enlarge)


In this mine you will find the following ore veins:


  • Iron Ore
  • Lesser Bloodstone Ore
  • Mithril Ore (but we cannot mine this yet)


3. Exit the mine and follow the path down to where you started by the tree to the path up to the mine. Look at my map again and follow my guide down to "Witherbark Village". You will notice there are a LOT of ogre type mobs here. Directly south of "Witherbark village" is a cave marked in blue on my map. This is full of ogres but you can also gather lots of ores from here too. 


4. Once you have been through this cave follow the map again, until you reach the area which I have highlighted in green on the map. This is an ogre mound known as "Boulderfist Hall" you can collect ores from inside the cave but beware of the ogres.


5. Continue on the route which I have marked on the map, to the area highlighted by the black target. This is another ogre intense area which is known as "Boulderfist Outpost". But it still offers a good density of ores if no-one else has been there before you. 


6. Follow the map again until you reach "Refuge Point" where you can smelt your ores to gain additional mining skill points.


When you reach 150 Mining Skill Points you will learn a new ability which is Toughness (Rank 2)
When you reach 155 Mining Skill Points you will be able to Mine Gold.
Continue mining and smelting in the "Arathi Highlands" until you have reached 175 mining skill.